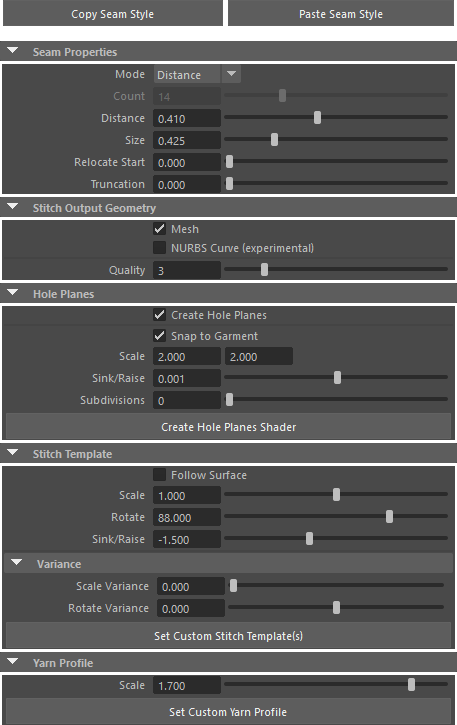
The Stitch Node
Attribute Description
These buttons allow users to copy the current settings from this actual stitch node and shader assignments of stitches and hole planes into a clipboard. The settings are kept even if Maya is closed in between* and can be pasted to other stitch nodes conveniently.
To copy all settings to the clipboard simply press Copy Seam Style.
To paste the current settings from the clipboard to any stitch node simply select the stitch node and press Paste Seam Style.
* shaders must be available in scene
Mode: Stitch can operate in two different modes Distance and Count. In count mode users set the absolute number of stitches directly while in distance mode the number of stitches is calculated from the length of the seam and the distance set.
Size: Overall resize attribute of the stitch. This resizes the length and the yarn proportionally.
Relocate Start: This offsets the stitches along the seam by the amount set. Use it to move the stitches if you don't want them to start at the start of the curve or edge loop.
Truncation: This cuts off the stitches by the amount set before the actual end.
Mesh: All stitches of this node will create one mesh.
NURBS Curve: The stitches will be output as one curve. This can be used for curve rendering. This only supports single stitch templates and is currently experimental.
Quality: The higher the value the more subdivisions the output geometry will have. This applies to meshes and curves.
Create Hole Planes: Switches on plane creation right in the middle of two stitches.
Snap to Garment: This will snap the planes to the current garment. Useful for seam trenches. Raise the subdivision value in this case.
Scale: Used to resize the planes
Sink/Raise: Controls the planes' immersion into the garment
Subdivision: Adds subdivions to the hole planes. Especially useful on complex geometry in conjunction with garment snapping.
Create Hole Planes Shader: creates and attaches a Maya Surface Shader with circular ramps to the plane's geometry. Use the place2dTexture nodes' Translate Frame attribute to control the position of the holes.
Follow Surface: This attributes tries to adapt each stitch more closely to the garment by subsampling the stitch template at each stitches point. Use this at e.g. very sharp corners where the stitches won't follow correctly.
Scale: Resizes the stitch but not the yarn
Rotate: Rotates the stitch around the surface normal of the garment at its current position
Sink/Raise: Controls the stitches' immersion into the garment
Scale Variance: This attribute can be used to simulate some random irregularities in the stitches sizing.
Rotate Variance: This attribute can be used to randomly rotate the stitches.
Set Custom Stitch Template(s): If you'd like to use one or more custom stitch templates do the following in this exact order:
1. SELECT the desired NURBS curve(s) to be used as stitch template(s)
2. SELECT some part of the stitch geometry (stitches, hole planes) to get access to the stitch node via the Attribute Editor
3. HIT this button
All settings of this particular stitch node will be applied to them.
Yarn Profile Scale: Resizes the yarn only
Set Custom Yarn Profile: Use this to set an individual yarn profile to be used. This has to be a NURBS curve. To replace the built-in yarn profile with an individual one do the following this exact order:
1. SELECT the NURBS curve to be used as yarn profile
2. SELECT some part of the stitch geometry (stitches, hole planes) to get access to the stitch node via the Attribute Editor
3. HIT this button
All settings of this particular stitch node will be applied to it.
Shows all objects the are contributing to the current output of this stitch node. The Garment is usually the input mesh one is applying the stitches to. If an input curve is used it will appear in Seam Curve. If an edge loop is used this attribute is blank. The Stitch attribute is populated if a non-default stitch template is being used. Finally the Yarn will show the curve that is used for the yarn profile, if it's set.
